Last session I started gathering ideas for my occultist. Now I’m going to start in on a set of sketches.
First thing is, I need to get into the mood. I love to find music that feels appropriate for the character. For this guy, I’m starting with this:
I felt I’d gotten a good direction going last session when I hit on those banyan robes, and I want to really play with the shape of the robe. One of the ways I like to make that possible is to work paper-doll style, and refine the character’s body and face a little more before dressing them. I work this way sometimes so I can cut away or add to the clothing on layers above, and just because I really love painting bodies.
Back for some more reference. I want to make him very thin; this is a guy who obsessively studies, neglecting to take care of himself or eat. I’ve collected a few models here for the torso:
In the first of the steps in the image below, I create a flat color layer underneath the rough outline layer, merge them, and start indicating some rough musculature, erasing or adding to the silhouette as I go.
In step 2, since I think he should be pale, I go to Adjust > Exposure and make him lighter than the background flat gray.
Step 3, I lock the transparency (in Photoshop, it’s the little checkerboard button in the Layers menu) and use a big soft brush set to Lighten mode, and using a dark gray I get rid of all the black outlines. I set the brush back to Normal, and use a light gray or white with a light tough to give a gentle spotlight effect on the top of the figure, and with a darker color I go over his legs to add to the feeling of the light dropping off further down the figure. That step is always really fun, it makes a very rough thumbnail suddenly feel like there’s some form and scale to it.
And in the 4th one, I switch back to my favorite, sharper-edged brush, which is an old chalk brush from a Jamie Jones brushpack I got, jeez, like 17 years ago? and modified to have both size and opacity set to pressure – it feels a lot like a soft pencil. I go in with a dark gray, not black, and bring back the deep shadows in the armpits, and a little dot of it in the bellybutton. Then I continue adding anatomical information and form to the torso and arms, turning the transparency lock on and off as I need to to adjust the silhouette. I am keeping the values pretty close together and not going all the way to black or white – I like to save those for the spots I want add the most interest to, later.
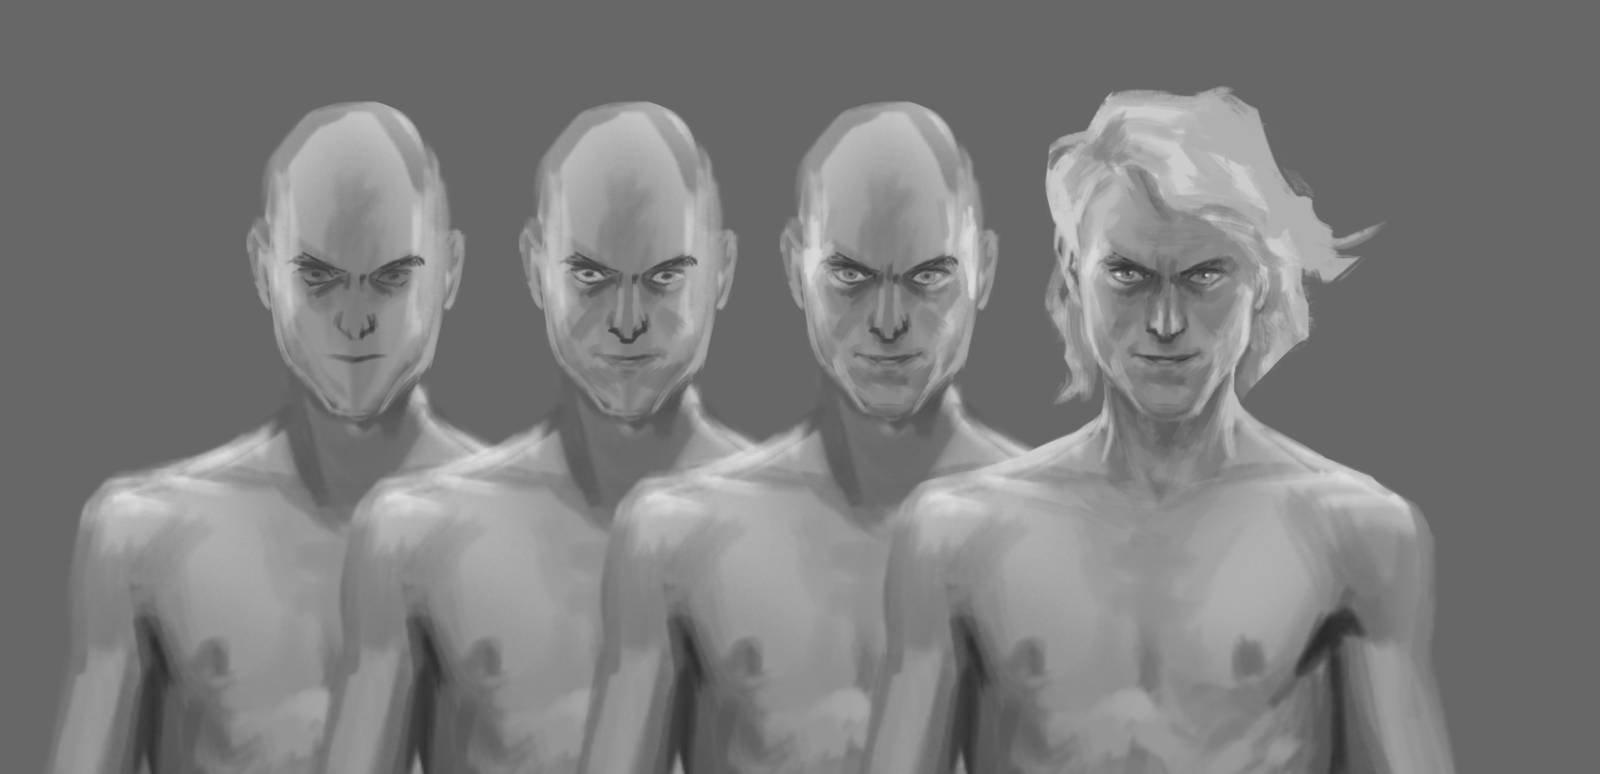
Next I’m going to focus in on his face. His expression will tell us a lot about what kind of person he is. I’m going to aim for charismatic but a bit deranged.
In the first step here, I’ve scribbled in the shape of his jaw and done what I call the anime version of his face. My faces always start out this way, with a rough, cartooned expression to capture the emotion in an exaggerated but simplified way.
In Step 2, I start figuring out the planes of the chin and cheeks.
Step 3, continuing the refinement process. I’ve decided to give him really pale eyes so he will always have a beady, crazy look to his eyes, with the pupil much more visible than the iris, making his eyes look like they’re open a little too wide all the time. I also add just a hint of a smile at the corners of his mouth – not too much, just the tiniest shadow.
In the last step, I slap some placeholder hair on him to figure out how the shadows on his forehead will work, and keep refining the forms of his face. I want to give him a narrow but deep nose. Adding little shines in the eyes is always fun!
Okay, this is far enough for a paper doll sketch base! Next time I’ll start in on the costume and hair for real.
To be continued…
PS – on January 29th at 8pm Eastern time, I will be giving an online lecture for Muddy Colors. It will be on The Artist’s Voice, first establishing what the visual components of voice are and then discussing my own journey with voice and how it’s changed over time. I’ll edit to add more details once I have them, check back here 🙂




Thanks for doing this series, the detailed breakdown of your working process and the decision making is really helpful!
I’m glad you’re enjoying it, thanks for following along!
Happy to share! Thanks for reading 🙂
Thanks for these steps! While I use photoshop a lot, I don’t paint much digitally, so I keep forgetting about some basic stuff like locking the transparency. Normally I would have made a new layer and set it as a clipping mask to achieve the same thing, but I just noticed that with the brush set to a different blending mode it’s NOT the same result. Also, the fact that the blending mode of the brush is sometimes, but not always, completely different from the blending mode of the layer, has always been a bit of mystery to me.
Yeah blending modes of your brush can be tricky to keep track of. I use them outside of their intended functions sometimes too, because when you paint over transparent pixels the brush behaves like it’s in normal mode, so you can use a brush mode incorrectly in order to fill in accidental gaps. Which is confusing to try to explain so no worries if it makes no sense reading it. It’s just a weird way of utilizing the brush misbehavior you’re mentioning 😄